The following is an excerpt from Chapter 8 of Ansible for DevOps , a book on Ansible by Jeff Geerling. The example highlights Ansible's simplicity and flexibility by provisioning and configuring of a highly available web application infrastructure on a local Vagrant-managed cloud, DigitalOcean droplets, and Amazon Web Services EC2 instances, with one set of Ansible playbooks.
tl;dr Check out the code on GitHub , and buy the book to learn more about Ansible!
Highly-Available Infrastructure with Ansible
Real-world web applications require redundancy and horizontal scalability with multi-server infrastructure. In the following example, we'll use Ansible to configure a complex infrastructure (illustrated below) on servers provisioned either locally via Vagrant and VirtualBox, or on a set of automatically-provisioned instances running on either DigitalOcean or Amazon Web Services:
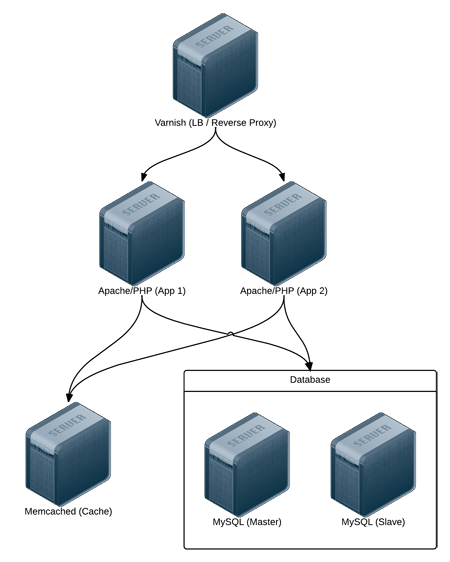
Varnish acts as a load balancer and reverse proxy, fronting web requests and routing them to the application servers. We could just as easily use something like Nginx or HAProxy , or even a proprietary cloud-based solution like an Amazon's Elastic Load Balancer or Linode's NodeBalancer , but for simplicity's sake, and for flexibility in deployment, we'll use Varnish.
Apache and mod_php run a PHP-based application that displays the entire stack's current status and outputs the current server's IP address for load balancing verification.
A Memcached server provides a caching layer that can be used to store and retrieve frequently-accessed objects in lieu of slower database storage.
Two MySQL servers, configured as a master and slave, offer redundant and performant database access; all data will be replicated from the master to the slave, and the slave can also be used as a secondary server for read-only queries to take some load off the master.
Directory Structure
In order to keep our configuration organized, we'll use the following structure for our playbooks and configuration:
lamp-infrastructure/
  inventories/
  playbooks/
    db/
    memcached/
    varnish/
    www/
  provisioners/
  configure.yml
  provision.yml
  requirements.txt
  Vagrantfile
Organizing things this way allows us to focus on each server configuration individually, then build playbooks for provisioning and configuring instances on different hosting providers later. This organization also keeps server playbooks completely independent, so we can modularize and reuse individual server configurations.
Individual Server Playbooks
Let's start building our individual server playbooks (in the
playbooks
directory). To make our playbooks more efficient, we'll use some contributed Ansible roles on Ansible Galaxy rather than install and configure everything step-by-step. We're going to target CentOS 6.x servers in these playbooks, but only minimal changes would be required to use the playbooks with Ubuntu, Debian, or later versions of CentOS.
Varnish
Create a
main.yml
file within the the
playbooks/varnish
directory, with the following contents:
---
- hosts: lamp-varnish
  sudo: yes

  vars_files:
    - vars.yml

  roles:
    - geerlingguy.firewall
    - geerlingguy.repo-epel
    - geerlingguy.varnish

  tasks:
    - name: Copy Varnish default.vcl.
      template:
        src: "templates/default.vcl.j2"
        dest: "/etc/varnish/default.vcl"
      notify: restart varnish
We're going to run this playbook on all hosts in the
lamp-varnish
inventory group (we'll create this later), and we'll run a few simple roles to configure the server:
geerlingguy.firewallconfigures a simple iptables-based firewall using a couple variables defined invars.yml.geerlingguy.repo-epeladds the EPEL repository (a prerequisite for varnish).geerlingguy.varnishinstalls and configures Varnish.
Finally, a task copies over a custom
default.vcl
that configures Varnish, telling it where to find our web servers and how to load balance requests between the servers.
Let's create the two files referenced in the above playbook. First,
vars.yml
, in the same directory as
main.yml
:
---
firewall_allowed_tcp_ports:
  - "22"
  - "80"

varnish_use_default_vcl: false
The first variable tells the
geerlingguy.firewall
role to open TCP ports 22 and 80 for incoming traffic. The second variable tells the
geerlingguy.varnish
we will supply a custom
default.vcl
for Varnish configuration.
Create a
templates
directory inside the
playbooks/varnish
directory, and inside, create a
default.vcl.j2
file. This file will use Jinja2 syntax to build Varnish's custom
default.vcl
file:
vcl 4.0;

import directors;

{% for host in groups['lamp-www'] %}
backend www{{ loop.index }} {
  .host = "{{ host }}";
  .port = "80";
}
{% endfor %}

sub vcl_init {
  new vdir = directors.random();
{% for host in groups['lamp-www'] %}
  vdir.add_backend(www{{ loop.index }}, 1);
{% endfor %}
}

sub vcl_recv {
  set req.backend_hint = vdir.backend();

  # For testing ONLY; makes sure load balancing is working correctly.
  return (pass);
}
We won't study Varnish's VCL syntax in depth but we'll run through
default.vcl
and highlight what is being configured:
- (1-3) Indicate that we're using the 4.0 version of the VCL syntax and import the
directorsvarnish module (which is used to configure load balancing). - (5-10) Define each web server as a new backend; give a host and a port through which varnish can contact each host.
- (12-17)
vcl_initis called when Varnish boots and initializes any required varnish modules. In this case, we're configuring a load balancervdir, and adding each of thewww[#]backends we defined earlier as backends to which the load balancer will distribute requests. We use arandomdirector so we can easily demonstrate Varnish's ability to distribute requests to both app backends, but other load balancing strategies are also available. - (19-24)
vcl_recvis called for each request, and routes the request through Varnish. In this case, we route the request to thevdirbackend defined invcl_init, and indicate that Varnish should not cache the result.
According to #4, we're actually bypassing Varnish's caching layer , which is not helpful in a typical production environment. If you only need a load balancer without any reverse proxy or caching capabilities, there are better options. However, we need to verify our infrastructure is working as it should. If we used Varnish's caching, Varnish would only ever hit one of our two web servers during normal testing.
In terms of our caching/load balancing layer, this should suffice. For a true production environment, you should remove the final
return (pass)
and customize
default.vcl
according to your application's needs.
Apache / PHP
Create a
main.yml
file within the the
playbooks/www
directory, with the following contents:
---
- hosts: lamp-www
  sudo: yes

  vars_files:
    - vars.yml

  roles:
    - geerlingguy.firewall
    - geerlingguy.repo-epel
    - geerlingguy.apache
    - geerlingguy.php
    - geerlingguy.php-mysql
    - geerlingguy.php-memcached

  tasks:
    - name: Remove the Apache test page.
      file:
        path: /var/www/html/index.html
        state: absent
    - name: Copy our fancy server-specific home page.
      template:
        src: templates/index.php.j2
        dest: /var/www/html/index.php
As with Varnish's configuration, we'll configure a firewall and add the EPEL repository (required for PHP's memcached integration), and we'll also add the following roles:
geerlingguy.apacheinstalls and configures the latest available version of the Apache web server.geerlingguy.phpinstalls and configures PHP to run through Apache.geerlingguy.php-mysqladds MySQL support to PHP.geerlingguy.php-memcachedadds Memcached support to PHP.
Two final tasks remove the default
index.html
home page included with Apache, and replace it with our PHP app.
As in the Varnish example, create the two files referenced in the above playbook. First,
vars.yml
, alongside
main.yml
:
---
firewall_allowed_tcp_ports:
  - "22"
  - "80"
Create a
templates
directory inside the
playbooks/www
directory, and inside, create an
index.php.j2
file. This file will use Jinja2 syntax to build a (relatively) simple PHP script to display the health and status of all the servers in our infrastructure:
<code>
<?php
/**
 * @file
 * Infrastructure test page.
 *
 * DO NOT use this in production. It is simply a PoC.
 */

$mysql_servers = array(
{% for host in groups['lamp-db'] %}
  '{{ host }}',
{% endfor %}
);
$mysql_results = array();
foreach ($mysql_servers as $host) {
  if ($result = mysql_test_connection($host)) {
    $mysql_results[$host] = '<span style="color: green;">PASS</span>';
    $mysql_results[$host] .= ' (' . $result['status'] . ')';
  }
  else {
    $mysql_results[$host] = '<span style="color: red;">FAIL</span>';
  }
}

// Connect to Memcached.
$memcached_result = '<span style="color: red;">FAIL</span>';
if (class_exists('Memcached')) {
  $memcached = new Memcached;
  $memcached->addServer('{{ groups['lamp-memcached'][0] }}', 11211);

  // Test adding a value to memcached.
  if ($memcached->add('test', 'success', 1)) {
    $result = $memcached->get('test');
    if ($result == 'success') {
      $memcached_result = '<span style="color: green;">PASS</span>';
      $memcached->delete('test');
    }
  }
}

/**
 * Connect to a MySQL server and test the connection.
 *
 * @param string $host
 *   IP Address or hostname of the server.
 *
 * @return array
 *   Array with keys 'success' (bool) and 'status' ('slave' or 'master').
 *   Empty if connection failure.
 */
function mysql_test_connection($host) {
  $username = 'mycompany_user';
  $password = 'secret';
  try {
    $db = new PDO(
      'mysql:host=' . $host . ';dbname=mycompany_database',
      $username,
      $password,
      array(PDO::ATTR_ERRMODE => PDO::ERRMODE_EXCEPTION));

    // Query to see if the server is configured as a master or slave.
    $statement = $db->prepare("SELECT variable_value
      FROM information_schema.global_variables
      WHERE variable_name = 'LOG_BIN';");
    $statement->execute();
    $result = $statement->fetch();

    return array(
      'success' => TRUE,
      'status' => ($result[0] == 'ON') ? 'master' : 'slave',
    );
  }
  catch (PDOException $e) {
    return array();
  }
}
?>
<!DOCTYPE html>
<html>
<head>
  <title>Host {{ inventory_hostname }}</title>
  <style>* { font-family: Helvetica, Arial, sans-serif }</style>
</head>
<body>
  <h1>Host {{ inventory_hostname }}</h1>
<?php foreach ($mysql_results as $host => $result): ?>
    <p>MySQL Connection (<code>
<?php print $host; ?>
</code>): <code>
<?php print $result; ?>
</code></p>
<?php endforeach; ?>
  <p>Memcached Connection: <code>
<?php print $memcached_result; ?>
</code></p>
</body>
</html>
Don't try transcribing this example manually; you can get the code from this book's repository on GitHub. Visit the ansible-for-devops repository and download the source for index.php.j2
As this is the heart of the example application we're deploying to the infrastructure, it's necessarily a bit more complex than most examples in the book, but a quick run through follows:
- (9-23) Iterate through all the
lamp-dbMySQL hosts defined in the playbook inventory, and test the ability to connect to them, and whether they are configured as master or slave, using themysql_test_connection()function defined later (40-73). - (25-39) Check the first defined
lamp-memcachedMemcached host defined in the playbook inventory, confirming the ability to connect and create, retrieve, and delete a value from the cache. - (41-76) Define the
mysql_test_connection()function which tests the the ability to connect to a MySQL server and also returns its replication status. - (78-91) Print the results of all the MySQL and Memcached tests, along with
{{ inventory_hostname }}as the page title, so we can easily see which web server is serving the viewed page.
At this point, the heart of our infrastructure â the application that will test and display the status of all our servers â is ready to go.
Memcached
Compared to the earlier playbooks, the Memcached playbook is quite simple. Create
playbooks/memcached/main.yml
with the following contents:
---
- hosts: lamp-memcached
  sudo: yes

  vars_files:
    - vars.yml

  roles:
    - geerlingguy.firewall
    - geerlingguy.memcached
As with the other servers, we need to ensure only the required TCP ports are open using the simple
geerlingguy.firewall
role. Next we install Memcached using the
geerlingguy.memcached
role.
In our
vars.yml
file (again, alongside
main.yml
), add the following:
---
firewall_allowed_tcp_ports:
  - "22"
firewall_additional_rules:
  - "iptables -A INPUT -p tcp --dport 11211 -s {{ groups['lamp-www'][0] }} -j ACCEPT"
  - "iptables -A INPUT -p tcp --dport 11211 -s {{ groups['lamp-www'][1] }} -j ACCEPT"
We need port 22 open for remote access, and for Memcached, we're adding manual iptables rules to allow access on port 11211 for the web servers only . We add one rule per
lamp-www
server by drilling down into each item in the the generated
groups
variable that Ansible uses to track all inventory groups currently available.
The principle of least privilege "requires that in a particular abstraction layer of a computing environment, every module ... must be able to access only the information and resources that are necessary for its legitimate purpose" (Source: Wikipedia ). Always restrict services and ports to only those servers or users that need access!
MySQL
The MySQL configuration is more complex than the other servers because we need to configure MySQL users per-host and configure replication. Because we want to maintain an independent and flexible playbook, we also need to dynamically create some variables so MySQL will get the right server addresses in any potential environment.
Let's first create the main playbook,
playbooks/db/main.yml
:
---
- hosts: lamp-db
  sudo: yes

  vars_files:
    - vars.yml

  pre_tasks:
    - name: Create dynamic MySQL variables.
      set_fact:
        mysql_users:
          - {
            name: mycompany_user,
            host: "{{ groups['lamp-www'][0] }}",
            password: secret,
            priv: "*.*:SELECT"
          }
          - {
            name: mycompany_user,
            host: "{{ groups['lamp-www'][1] }}",
            password: secret,
            priv: "*.*:SELECT"
          }
        mysql_replication_master: "{{ groups['a4d.lamp.db.1'][0] }}"

  roles:
    - geerlingguy.firewall
    - geerlingguy.mysql
Most of the playbook is straightforward, but in this instance, we're using
set_fact
as a
pre_task
(to be run before the
geerlingguy.firewall
and
geerlingguy.mysql
roles) to dynamically create variables for MySQL configuration.
set_fact
allows us to define variables at runtime, so we can are guaranteed to have all server IP addresses available, even if the servers were freshly provisioned at the beginning of the playbook's run. We'll create two variables:
mysql_usersis a list of users thegeerlingguy.mysqlrole will create when it runs. This variable will be used on all database servers so both of the twolamp-wwwservers getSELECTprivileges on all databases.mysql_replication_masteris used to indicate to thegeerlingguy.mysqlrole which database server is the master; it will perform certain steps differently depending on whether the server being configured is a master or slave, and ensure that all the slaves are configured to replicate data from the master.
We'll need a few other normal variables to configure MySQL, so we'll add them alongside the firewall variable in
playbooks/db/vars.yml
:
---
firewall_allowed_tcp_ports:
  - "22"
  - "3306"

mysql_replication_user: {name: 'replication', password: 'secret'}
mysql_databases:
  - { name: mycompany_database, collation: utf8_general_ci, encoding: utf8 }
We're opening port 3306 to anyone, but according to the principle of least privilege discussed earlier, you would be justified in restricting this port to only the servers and users that need access to MySQL (similar to the memcached server configuration). In this case, the attack vector is mitigated because MySQL's own authentication layer is used through the
mysql_user
variable generated in
main.yml
.
We are defining two MySQL variables,
mysql_replication_user
to be used as for master and slave replication, and
mysql_databases
to define a list of databases that will be created (if they don't already exist) on the database servers.
With the configuration of the database servers complete, the server-specific playbooks are ready to go.
Main Playbook for Configuring All Servers
A simple playbook including each of the group-specific playbooks is all we need for the overall configuration to take place. Create
configure.yml
in the project's root directory, with the following contents:
---
- include: playbooks/varnish/main.yml
- include: playbooks/www/main.yml
- include: playbooks/db/main.yml
- include: playbooks/memcached/main.yml
At this point, if you had some already-booted servers and statically defined inventory groups like
lamp-www
,
lamp-db
, etc., you could run
ansible-playbook configure.yml
and you'd have a full HA infrastructure at the ready!
But we're going to continue to make our playbooks more flexible and useful.
Getting the required roles
Ansible allows you to define all the required Ansible Galaxy roles for a given project in a
requirements.txt
file. Instead of having to remember to run
ansible-galaxy install -y [role1] [role2] [role3]
for each of the roles we're using, we can create
requirements.txt
in the root of our project, with the following contents:
geerlingguy.firewall
geerlingguy.repo-epel
geerlingguy.varnish
geerlingguy.apache
geerlingguy.php
geerlingguy.php-mysql
geerlingguy.php-memcached
geerlingguy.mysql
geerlingguy.memcached
To make sure all the required dependencies are available, just run
ansible-galaxy install -r requirements.txt
from within the project's root.
Ansible 1.8 and greater provide more flexibility in requirements files. If you use a YAML file (e.g.
requirements.yml) to define a structured list of all the roles you need, you can source them from Ansible Galaxy, a git repository, a web-accessible URL (as a.tar.gz), or even a mercurial repository! See the documentation for Advanced Control over Role Requirements Files .
Vagrantfile for Local Infrastructure via VirtualBox
As with many other examples in this book, we can use Vagrant and VirtualBox to build and configure the infrastructure locally. This lets us test things as much as we want with zero cost, and usually results in faster testing cycles, since everything is orchestrated over a local private network on a (hopefully) beefy workstation.
Our basic Vagrantfile layout will be something like the following:
- Define a base box (in this case, CentOS 6.x) and VM hardware defaults.
- Define all the VMs to be built, with VM-specific IP addresses and hostname configurations.
- Define the Ansible provisioner along with the last VM, so Ansible can run once at the end of Vagrant's build cycle.
Here's the Vagrantfile in all its glory:
# -*- mode: ruby -*-
# vi: set ft=ruby :

Vagrant.configure("2") do |config|
  # Base VM OS configuration.
  config.vm.box = "geerlingguy/centos6"

  # General VirtualBox VM configuration.
  config.vm.provider :virtualbox do |v|
    v.customize ["modifyvm", :id, "--memory", 512]
    v.customize ["modifyvm", :id, "--cpus", 1]
    v.customize ["modifyvm", :id, "--natdnshostresolver1", "on"]
    v.customize ["modifyvm", :id, "--ioapic", "on"]
  end

  # Varnish.
  config.vm.define "varnish" do |varnish|
    varnish.vm.hostname = "varnish.dev"
    varnish.vm.network :private_network, ip: "192.168.2.2"
  end

  # Apache.
  config.vm.define "www1" do |www1|
    www1.vm.hostname = "www1.dev"
    www1.vm.network :private_network, ip: "192.168.2.3"

    www1.vm.provision "shell",
      inline: "sudo yum update -y"

    www1.vm.provider :virtualbox do |v|
      v.customize ["modifyvm", :id, "--memory", 256]
    end
  end

  # Apache.
  config.vm.define "www2" do |www2|
    www2.vm.hostname = "www2.dev"
    www2.vm.network :private_network, ip: "192.168.2.4"

    www2.vm.provision "shell",
      inline: "sudo yum update -y"

    www2.vm.provider :virtualbox do |v|
      v.customize ["modifyvm", :id, "--memory", 256]
    end
  end

  # MySQL.
  config.vm.define "db1" do |db1|
    db1.vm.hostname = "db1.dev"
    db1.vm.network :private_network, ip: "192.168.2.5"
  end

  # MySQL.
  config.vm.define "db2" do |db2|
    db2.vm.hostname = "db2.dev"
    db2.vm.network :private_network, ip: "192.168.2.6"
  end

  # Memcached.
  config.vm.define "memcached" do |memcached|
    memcached.vm.hostname = "memcached.dev"
    memcached.vm.network :private_network, ip: "192.168.2.7"

    # Run Ansible provisioner once for all VMs at the end.
    memcached.vm.provision "ansible" do |ansible|
      ansible.playbook = "configure.yml"
      ansible.inventory_path = "inventories/vagrant/inventory"
      ansible.limit = "all"
      ansible.extra_vars = {
        ansible_ssh_user: 'vagrant',
        ansible_ssh_private_key_file: "~/.vagrant.d/insecure_private_key"
      }
    end
  end
end
Most of the Vagrantfile is straightforward, and similar to other examples used in this book. The last block of code, which defines the
ansible
provisioner configuration, contains three extra values that are important for our purposes:
      ansible.inventory_path = "inventories/vagrant/inventory"
      ansible.limit = "all"
      ansible.extra_vars = {
        ansible_ssh_user: 'vagrant',
        ansible_ssh_private_key_file: "~/.vagrant.d/insecure_private_key"
      }
ansible.inventory_pathdefines an inventory file to be used with theansible.playbook. You could certainly create a dynamic inventory script for use with Vagrant, but because we know the IP addresses ahead of time, and are expecting a few specially-crafted inventory group names, it's simpler to build the inventory file for Vagrant provisioning by hand (we'll do this next).ansible.limitis set toallso Vagrant knows it should run the Ansible playbook connected to all VMs, and not just the current VM. You could technically useansible.limitwith a provisioner configuration for each of the individual VMs, and just run the VM-specific playbook through Vagrant, but our live production infrastructure will be using one playbook to configure all the servers, so we'll do the same locally.ansible.extra_varscontains the vagrant SSH user configuration for Ansible. It's more standard to include these settings in a static inventory file or use Vagrant's automatically-generated inventory file, but it's easiest to set them once for all servers here.
Before running
vagrant up
to see the fruits of our labor, we need to create an inventory file for Vagrant at
inventories/vagrant/inventory
:
[lamp-varnish]
192.168.2.2

[lamp-www]
192.168.2.3
192.168.2.4

[a4d.lamp.db.1]
192.168.2.5

[lamp-db]
192.168.2.5
192.168.2.6

[lamp-memcached]
192.168.2.7
Now
cd
into the project's root directory, run
vagrant up
, and after ten or fifteen minutes, load
https://192.168.2.2/
in your browser. Voila!
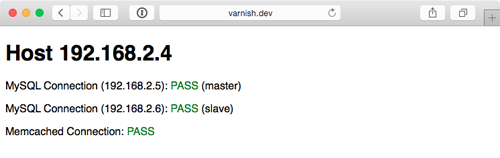
You should see something like the above screenshot; the PHP app simply displays the current app server's IP address, the individual MySQL servers' status, and the Memcached server status. Refresh the page a few times to verify Varnish is distributing requests randomly between the two app servers.
We have local infrastructure development covered, and Ansible makes it easy to use the exact same configuration to build our infrastructure in the cloud.
Provisioner Configuration: DigitalOcean
In Chapter 7, we learned provisioning and configuring DigitalOcean droplets in an Ansible playbook is fairly simple. But we need to take provisioning a step further by provisioning multiple droplets (one for each server in our infrastructure) and dynamically grouping them so we can configure them after they are booted and online.
For the sake of flexibility, let's create a playbook for our DigitalOcean droplets in
provisioners/digitalocean.yml
. This will allow us to add other provisioner configurations later, alongside the
digitalocean.yml
playbook. As with our example in Chapter 7, we will use a local connection to provision cloud instances. Begin the playbook with:
---
- hosts: localhost
  connection: local
  gather_facts: false
Next we need to define some metadata to describe each of our droplets. For simplicity's sake, we'll inline the
droplets
variable in this playbook:
  vars:
    droplets:
      - { name: a4d.lamp.varnish, group: "lamp-varnish" }
      - { name: a4d.lamp.www.1, group: "lamp-www" }
      - { name: a4d.lamp.www.2, group: "lamp-www" }
      - { name: a4d.lamp.db.1, group: "lamp-db" }
      - { name: a4d.lamp.db.2, group: "lamp-db" }
      - { name: a4d.lamp.memcached, group: "lamp-memcached" }
Each droplet is an object with two keys:
name: The name of the Droplet for DigitalOcean's listings and Ansible's host inventory.group: The Ansible inventory group for the droplet.
Next we need to add a task to create the droplets, using the
droplets
list as a guide, and as part of the same task, register each droplet's information in a separate dictionary,
created_droplets
:
  tasks:
    - name: Provision DigitalOcean droplets.
      digital_ocean:
        state: "{{ item.state | default('present') }}"
        command: droplet
        name: "{{ item.name }}"
        private_networking: yes
        size_id: "{{ item.size | default(66) }}" # 512mb
        image_id: "{{ item.image | default(6372108) }}" # CentOS 6 x64.
        region_id: "{{ item.region | default(4) }}" # NYC2
        ssh_key_ids: "{{ item.ssh_key | default('138954') }}" # geerlingguy
        unique_name: yes
      register: created_droplets
      with_items: droplets
Many of the options (e.g.
size_id
) are defined as
{{ item.property | default('default_value') }}
, which allows us to use optional variables per droplet. For any of the defined droplets, we could add
size_id: 72
(or whatever valid value you'd like), and it would override the default value set in the task.
You could specify an SSH public key per droplet, or (as in this instance) use the same key for all hosts by providing a default. In this case, I added an SSH key to my DigitalOcean account, then used the DigitalOcean API to retrieve the key's numeric ID (as described in the previous chapter).
It's best to use key-based authentication and add at least one SSH key to your DigitalOcean account so Ansible can connect using keys instead of insecure passwords, especially since these instances will be created with only a root account.
We loop through all the defined
droplets
using
with_items: droplets
, and after each droplet is created add the droplet's metadata (name, IP address, etc.) to the
created_droplets
variable. Next, we'll loop through that variable to build our inventory on-the-fly so our configuration applies to the correct servers:
    - name: Add DigitalOcean hosts to their respective inventory groups.
      add_host:
        name: "{{ item.1.droplet.ip_address }}"
        groups: "do,{{ droplets[item.0].group }},{{ item.1.droplet.name }}"
        # You can dynamically add inventory variables per-host.
        ansible_ssh_user: root
        mysql_replication_role: >
          "{{ 'master' if (item.1.droplet.name == 'a4d.lamp.db.1')
          else 'slave' }}"
        mysql_server_id: "{{ item.0 }}"
      when: item.1.droplet is defined
      with_indexed_items: created_droplets.results
You'll notice a few interesting things happening in this task:
- This is the first time we've used
with_indexed_items. The reason for using this less-common loop feature is to add a sequential and uniquemysql_server_id. Though only the MySQL servers need a server ID set, it's simplest to dynamically create the variable for every server, so it's available when needed.with_indexed_itemssimply setsitem.0to the key of the item, anditem.1to the value of the item. with_indexed_itemsalso helps us reliably set each droplet's group. Because the v1 DigitalOcean API doesn't support features like tags for Droplets, we need to set up the groups on our own. Using thedropletsvariable we manually created earlier allows us to set the proper group for a particular droplet.- Finally we add inventory variables per-host in
add_hostby adding the variable name as a key, and the variable value as the key's value. Simple, but powerful!
There are a few different ways you can approach dynamic provisioning and inventory management for your infrastructure, and, especially if you are only targeting one cloud hosting provider, there are ways to avoid using more exotic features of Ansible (e.g.
with_indexed_items) and complex if/else conditions. This example is slightly more complex due to the fact that the playbook is being created to be interchangeable with other similar provisioning playbooks.
The final step in our provisioning is to make sure all the droplets are booted and can be reached via SSH, so at the end of the
digitalocean.yml
playbook, add another play to be run on hosts in the
do
group we just defined:
- hosts: do
  remote_user: root

  tasks:
    - name: Wait for port 22 to become available.
      local_action: "wait_for port=22 host={{ inventory_hostname }}"
Once we know port 22 is reachable, we know the droplet is up and ready for configuration.
We're almost ready to provision and configure our entire infrastructure on DigitalOcean, but we need to create one last playbook to tie everything together. Create
provision.yml
in the project root with the following contents:
---
- include: provisioners/digitalocean.yml
- include: configure.yml
That's it! Now, assuming you set the environment variables
DO_CLIENT_ID
and
DO_API_KEY
, you can run
$ ansible-playbook provision.yml
to provision and configure the infrastructure on DigitalOcean.
The entire process should take about 15 minutes, and once it's complete, you should see something like:
PLAY RECAP *****************************************************************
107.170.27.137             : ok=19   changed=13   unreachable=0    failed=0
107.170.3.23               : ok=13   changed=8    unreachable=0    failed=0
107.170.51.216             : ok=40   changed=18   unreachable=0    failed=0
107.170.54.218             : ok=27   changed=16   unreachable=0    failed=0
162.243.20.29              : ok=24   changed=15   unreachable=0    failed=0
192.241.181.197            : ok=40   changed=18   unreachable=0    failed=0
localhost                  : ok=2    changed=1    unreachable=0    failed=0
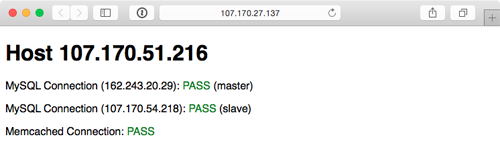
Visit the IP address of the varnish server and you should be greeted with a status page similar to the one generated by the Vagrant-based infrastructure:
Because everything in this playbook is idempotent, running
$ ansible-playbook provision.yml
again should report no changes, and helps you verify that everything is running correctly.
Ansible will also rebuild and reconfigure any droplets that may be missing from your infrastructure. If you're daring, and want to test this feature, just log into your DigitalOcean account, delete one of the droplets just created by this playbook (maybe one of the two app servers), then run the playbook again.
Now that we've tested our infrastructure on DigitalOcean, we can destroy the droplets just as easily (change the
state
parameter in
provisioners/digitalocean.yml
to default to
'absent'
and run
$ ansible-playbook provision.yml
again).
Next up, we'll build the infrastructure a third timeâon Amazon's infrastructure.
Provisioner Configuration: Amazon Web Services (EC2)
For Amazon Web Services, provisioning works slightly different. Amazon has a broader ecosystem of services surrounding EC2 instances, and for our particular example, we will need to configure security groups prior to provisioning instances.
To begin, create
aws.yml
inside the
provisioners
directory and begin the playbook the same ways as with DigitalOcean:
---
- hosts: localhost
  connection: local
  gather_facts: false
EC2 instances use security groups as an AWS-level firewall (which operates outside the individual instance's OS). We will need to define a list of
security_groups
alongside our EC2
instances
. First, the
instances
:
  vars:
    instances:
      - {
        name: a4d.lamp.varnish,
        group: "lamp-varnish",
        security_group: ["default", "a4d_lamp_http"]
      }
      - {
        name: a4d.lamp.www.1,
        group: "lamp-www",
        security_group: ["default", "a4d_lamp_http"]
      }
      - {
        name: a4d.lamp.www.2,
        group: "lamp-www",
        security_group: ["default", "a4d_lamp_http"]
      }
      - {
        name: a4d.lamp.db.1,
        group: "lamp-db",
        security_group: ["default", "a4d_lamp_db"]
      }
      - {
        name: a4d.lamp.db.2,
        group: "lamp-db",
        security_group: ["default", "a4d_lamp_db"]
      }
      - {
        name: a4d.lamp.memcached,
        group: "lamp-memcached",
        security_group: ["default", "a4d_lamp_memcached"]
      }
Inside the
instances
variable, each instance is an object with three keys:
name: The name of the instance, which we'll use to tag the instance and ensure only one instance is created per name.group: The Ansible inventory group in which the instance should belong.security_group: A list of security groups into which the instance will be placed. Thedefaultsecurity group comes is added to your AWS account upon creation, and has one rule to allow outgoing traffic on any port to any IP address.
If you use AWS exclusively, it would be best to autoscaling groups and change the design of this infrastructure a bit. For this example, we just need to ensure that the six instances we explicitly define are created, so we're using particular
names and anexact_countto enforce the 1:1 relationship.
With our instances defined, we'll next define a
security_groups
variable containing all the required security group configuration for each server:
    security_groups:
      - name: a4d_lamp_http
        rules:
          - { proto: tcp, from_port: 80, to_port: 80, cidr_ip: 0.0.0.0/0 }
          - { proto: tcp, from_port: 22, to_port: 22, cidr_ip: 0.0.0.0/0 }
        rules_egress: []
      - name: a4d_lamp_db
        rules:
          - { proto: tcp, from_port: 3306, to_port: 3306, cidr_ip: 0.0.0.0/0 }
          - { proto: tcp, from_port: 22, to_port: 22, cidr_ip: 0.0.0.0/0 }
        rules_egress: []
      - name: a4d_lamp_memcached
        rules:
          - { proto: tcp, from_port: 11211, to_port: 11211, cidr_ip: 0.0.0.0/0 }
          - { proto: tcp, from_port: 22, to_port: 22, cidr_ip: 0.0.0.0/0 }
        rules_egress: []
Each security group has a
name
(which was used to identify the security group in the
instances
list),
rules
(a list of firewall rules like protocol, ports, and IP ranges to limit incoming traffic), and
rules_egress
(a list of firewall rules to limit outgoing traffic).
We need three security groups:
a4d_lamp_http
to open port 80,
a4d_lamp_db
to open port 3306, and
a4d_lamp_memcached
to open port 11211.
Now that we have all the data we need to set up security groups and instances, the first task needs to to create or verify the existence of the security groups:
  tasks:
    - name: Configure EC2 Security Groups.
      ec2_group:
        name: "{{ item.name }}"
        description: Example EC2 security group for A4D.
        region: "{{ item.region | default('us-west-2') }}" # Oregon
        state: present
        rules: "{{ item.rules }}"
        rules_egress: "{{ item.rules_egress }}"
      with_items: security_groups
The
ec2_group
requires a name, region, and rules for each security group. Security groups will be created if they don't exist, modified to match the supplied values if they do exist, or simply verified if they exist and match the given values.
With the security groups configured, we can provision the defined EC2 instances by looping through
instances
with the
ec2
module:
    - name: Provision EC2 instances.
      ec2:
        key_name: "{{ item.ssh_key | default('jeff_mba_home') }}"
        instance_tags:
          inventory_group: "{{ item.group | default('') }}"
          inventory_host: "{{ item.name | default('') }}"
        group: "{{ item.security_group | default('') }}"
        instance_type: "{{ item.type | default('t2.micro')}}" # Free Tier
        image: "{{ item.image | default('ami-11125e21') }}" # RHEL6 x64 hvm
        region: "{{ item.region | default('us-west-2') }}" # Oregon
        wait: yes
        wait_timeout: 500
        exact_count: 1
        count_tag:
          inventory_group: "{{ item.group | default('') }}"
          inventory_host: "{{ item.name | default('') }}"
      register: created_instances
      with_items: instances
This example is slightly more complex than the DigitalOcean example, and a few parts warrant a deeper look:
- EC2 allows SSH keys to be defined by nameâin my case, I have a key
jeff_mba_homein my AWS account. You should set thekey_namedefault to a key that you have in your account. - Instance tags are tags that AWS will attach to your instance, for categorization purposes. By giving a list of keys and values, I can then use that list later in the
count_tagparameter. t2.microwas used as the default instance type, since it falls within EC2's free tier usage. If you just set up an account and keep all AWS resource usage within free tier limits, you won't be billed anything.exact_countandcount_tagwork together to ensure AWS provisions only one of each of the instances we defined. Thecount_tagtells theec2module to match the given group + host and thenexact_counttells the module to only provision1instance. If you wanted to remove all your instances, you could setexact_countto 0 and run the playbook again.
Each provisioned instance will have its metadata added to the registered
created_instances
variable, which we'll use to build Ansible inventory groups for the server configuration playbooks.
    - name: Add EC2 instances to their respective inventory groups.
      add_host:
        name: "{{ item.1.tagged_instances.0.public_ip }}"
        groups: "aws,{{ item.1.item.group }},{{ item.1.item.name }}"
        # You can dynamically add inventory variables per-host.
        ansible_ssh_user: ec2-user
        mysql_replication_role: >
          {{ 'master' if (item.1.item.name == 'a4d.lamp.db.1')
          else 'slave' }}
        mysql_server_id: "{{ item.0 }}"
      when: item.1.instances is defined
      with_indexed_items: created_instances.results
This
add_host
example is slightly simpler than the one for DigitalOcean, because AWS attaches metadata to EC2 instances which we can re-use when building groups or hostnames (e.g.
item.1.item.group
). We don't have to use list indexes to fetch group names from the original
instances
variable.
We still use
with_indexed_items
so we can use the index to generate a unique ID per server for use in building the MySQL master-slave replication.
The final step in provisioning the EC2 instances is to ensure we can connect to them before continuing, and to set
selinux
into permissive mode so the configuration we supply will work correctly.
# Run some general configuration on all AWS hosts.
- hosts: aws
  gather_facts: false

  tasks:
    - name: Wait for port 22 to become available.
      local_action: "wait_for port=22 host={{ inventory_hostname }}"

    - name: Set selinux into 'permissive' mode.
      selinux: policy=targeted state=permissive
      sudo: yes
Since we defined
ansible_ssh_user
as
ec2-user
in the dynamically-generated inventory above, we need to ensure the
selinux
task runs with
sudo
explicitly.
Now, modify the
provision.yml
file in the root of the project folder, and change the provisioners include to look like the following:
---
- include: provisioners/aws.yml
- include: configure.yml
Assuming the environment variables
AWS_ACCESS_KEY_ID
and
AWS_SECRET_ACCESS_KEY
are set in your current terminal session, you can run
$ ansible-playbook provision.yml
to provision and configure the infrastructure on AWS.
The entire process should take about 15 minutes, and once it's complete, you should see something like:
PLAY RECAP *****************************************************************
54.148.100.44              : ok=24   changed=16   unreachable=0    failed=0
54.148.120.23              : ok=40   changed=19   unreachable=0    failed=0
54.148.41.134              : ok=40   changed=19   unreachable=0    failed=0
54.148.56.137              : ok=13   changed=9    unreachable=0    failed=0
54.69.160.32               : ok=27   changed=17   unreachable=0    failed=0
54.69.86.187               : ok=19   changed=14   unreachable=0    failed=0
localhost                  : ok=3    changed=1    unreachable=0    failed=0
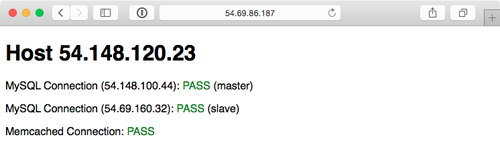
Visit the IP address of the varnish server (the first server configured) and you should be greeted with a status page similar to the one generated by the Vagrant and DigitalOcean-based infrastructure:
As with the earlier examples, running
ansible-playbook provision.yml
again should produce no changes, because everything in this playbook is idempotent. And if one of your instances were terminated, running the playbook again would recreate and reconfigure the instance in a few minutes.
To terminate all the provisioned instances, you can change the
exact_count
in the
ec2
task to
0
, and run
$ ansible-playbook provision.yml
again.
Summary
In the above example, an entire highly-available PHP application infrastructure was defined in a series of short Ansible playbooks, and then provisioning configuration was created to build the infrastructure on either local VMs, DigitalOcean droplets, or AWS EC2 instances.
Once you start working on building infrastructure this way â abstracting individual servers, then abstracting cloud provisioning â you'll start to see some of Ansible's true power in being more than just a configuration management tool. Imagine being able to create your own multi-datacenter, multi-provider infrastructure with Ansible and some basic configuration.
While Amazon, DigitalOcean, Rackspace and other hosting providers have their own tooling and unique infrastructure merits, the agility and flexibility afforded by building infrastructure in a provider-agnostic fashion lets you treat hosting providers as commodities, and gives you freedom to build more reliable, performant, and simple application infrastructure.
Even if you plan on running everything within one hosting provider's network (or in a private cloud, or even on a few bare metal servers), Ansible provides deep stack-specific integration so you can do whatever you need to do and manage the provider's services within your playbooks.
You can find the entire contents of this example in the Ansible for DevOps GitHub repository , in the
lamp-infrastructuredirectory.
Purchase Ansible for DevOps on LeanPub , Amazon , or iTunes .