I have to give Intel some credit. When the chipmaker debuted its PCIe-card based Compute Element back in 2019 , moving the CPU, RAM, storage and more off the motherboard, I was skeptical the company would stick with the form factor. Yet here we are going on four years later and the company's latest 'Eden' compute element not only packs a 12th Gen CPU, but they come with standard socketed desktop chips this time around, in the form of a Core i7-12700 or the Core i9-12900 they sent our way, packed inside the company's complicated but impressively compact (8-liter) NUC 12 Extreme 'Dragon Canyon' kit.

First off, let's tackle pricing. The Compute Element itself is basically a PCIe expansion board with an LGA1700 socket, CPU, and two slots for SO-DIMM (laptop) DDR4 RAM and two M.2 sockets, plus a surprising amount of ports and headers, starts at $750. But if you want one with a Core i9-12900 CPU, the price jumps to $1450. Keep in mind these prices are without RAM, storage or an OS. And if you want something to plug your Eden Element into, the full NUC 12 Extreme Kit, basically a case with a daughter board, three fans, and a 650W SFX power supply, a second PCIe slot for installing a dedicated GPU, plus the Compute Element with your choice of CPU, will sell for $1,150 for the i7 model or $1,450 for the i9 Intel sent our way. You could, however, also use this to upgrade previous gen NUC Extreme kits.
Keep in mind, just like with the card, those prices don't include storage, RAM, an OS, or a GPU. And don't expect to drop in something beefy like a 3080 Ti. The NUC 12 Extreme supports cards up to 12 inches long, but only two slots thick. Anything thicker and you aren't going to be able to put the side panel on because your blower is going to be hanging outside the chassis, which is impressively compact at about 14 x 4.75 x 7.5 inches (LWH). The dimensions are basically the same as last year's NUC 11 Extreme , although there's a USB-C port up front now and one USB-A, where the previous model had two USB-A ports. The ports on the Compute Element are also different, which we'll delve into in the next section.
Competition and Eden Compute Element
In terms of packing high-end components into a small space, the closest thing I can think of to the NUC 12 Extreme is Corsair's One i300 . That system is noticeably bigger at 14.96 x 6.93 x 7.87, but it's a vertical tower, so takes up far less desk space. It supports higher-end CPUs and GPUs, and both are liquid-cooled.
The NUC 12 Extreme, meanwhile, has three fans up top for cooling, a tiny cooler with a modest amount of fins for its CPU and the surrounding VRMs (to be fair, both CPU options are moderate 65W models), and a plastic fan duct designed to pull cool air from outside the chassis. The problem with the latter, though, is that due to the five-slot design of the chassis, the intake vent for the CPU duct sits right next to the rear vent for your GPU. At the very least, you probably want to avoid blower-style GPUs with this kit. Otherwise, during gaming or other GPU-heavy loads, your CPU is going to be sucking down the warm air exhausted by your graphics card. Every compact, high-power system is going to have some thermal compromises, but this, paired with the slim cooler of the CPU, seems far from ideal, especially on i9 models.
That said, the port selection on the expansion bracket of the Eden Compute Element is more packed with ports than many full-size motherbaords. You get six 10 Gbps Type-A ports, two Thunderbolt 4 ports, both 10 and 2.5 Gb Ethernet ports and a full-size HDMI port. That's a whole lot of connectivity in a small space. But it's also so packed together that it's going to be tough to use most of it at the same time, unless you're just plugging in cables.
Disassembly and Setup
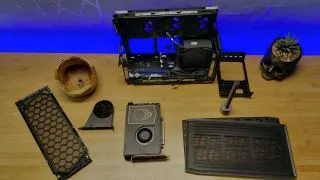
With all those details out of the way, it's worth pointing out just how complicated it is to get the NUC 12 Extreme kit up and running. There is a whole lot of disassembly involved and some very tight clearances.
Because the kit needs storage and RAM, both of which are installed inside the compute element, you need to first open the chassis. To begin this process you need to loosen four captive Philips head screws at the back. Then the two mesh side panels pull off from the rear section, giving you access to the interior.
But to remove the Compute Element, you'll need to get access to the top. While it's not immediately clear (although parts of the metal frame near the top are labeled 'pull), the whole top portion, fans and all, flips up from the top outer edge. From there, removing another screw lets you lift up the flap locking the expansion brackets. Removing two more screws from the brackets finally sets the Compute Element free.
But don't try to remove the card yet, because there are still a bunch of cables that need to be unplugged. At the end of the card are the eight-pin CPU power connector, two front-panel USB connectors (there's an additional USB-C and USB-A port up front, along with an SD card slot and an audio jack), to antenna connection points for the Wi-Fi hiding up on the top edge of the card (which required pliers for me to get off), and a couple more small header plugs that you can't even see because the power supply is in the way. This can be mitigated somewhat by removing the power supply. But doing that requires taking four screws out from the back, then unplugging the other and of one of the USB front-panel cables on the bottom of the chassis (because it blocks the removal of the PSU), and then slowly edging the power supply out of its cramped space in the front of the case. Only you can't remove it very far because the main PSU power socket cable, which is permanently attached, has about two inches of slack and routes up through the top three-fan housing to the back of the case, where you plug in your standard three-prong PSU cable.
Once you've done all that, then removed two small header cables on the Compute Element board, you can remove it. And only now, after much complex and careful disassembly, can you start taking the Compute Element apart so you can install your storage and RAM.
I did this the first time, only without removing the PSU. And because everything was so close together, there were clearly some moments where bits were pushing up against other parts of the case. But with the Compute Element out I installed two SO-DIMMs (for a total of 64GB of RAM) and and a 512GB Patriot PCIe 3.0 SSD. I then put the whole thing back together, installed an RTX 2060 GPU (the only graphics card I had on hand that was slim enough to fit), and put the whole thing carefully back together.
Powering up the NUC 12 Extreme (or trying to)
With everything back in its place (or so I thought), and the power supply plugged in, I powered the system up –- or at least attempted to. The fans on the GPU spun up, but not the fans on the chassis, and the system didn't boot. After disassembling the NUC 12 Extreme kit again, carefully, I looked closely at the Compute Element and the rest of the internals, eventually noticing a yellow three-pin jumper, with its three pins still intact, laying at the bottom of the chassis.
After some back-and-forth with an Intel rep, they confirmed this was the "recovery jumper," which normally sits on the end of the board, near a couple of those small header cables that connect bits of the Compute Element to the front-panel portions of the case. It must have gotten snagged when I removed the Element for the first time. Clearly, this was the reason the kit wouldn't boot.
Intel did send us a second unit of the NUC 12 Extreme, but it arrived less than 24 hours before launch, so we haven't yet gotten a chance to do any testing. We're working on it, so stay tuned for some performance benchmarks.
But one thing I can say is that the NUC 12 Extreme Dragon Canyon is probably the most densely packed and complicated PC I've dealt with in nearly 14 years of professionally covering consumer technology. It's not for the faint of heart and setting it up is much more akin to what you might expect from an attempt to repair a piece of stereo equipment than building a PC.
That, plus the fact that it's so expensive ($1,450, without a GPU, storage, RAM or an OS), means that most people would be better off opting for something like Corsair's One i300 if they want a compact, powerful PC for gaming or other intense workloads. That system is also very expensive, but it has much better (liquid) cooling for both the CPU and graphics card. And while it is somewhat larger, its vertical orientation means that it will take up much less space on your desk or floor than the NUC 12 Extreme. Plus you're a lot less likely to damage the Corsair system while performing a required complicated disassembly since it comes completely assembled out of the box.