
As a maker I love receiving new maker toys to play with. Soldering irons (I have so many now!), 3D printers, microcontroller, Single Board Computers (SBC) and add-ons are just the tip of the catalog available to makers. As we approach the holiday season, thoughts often turn to buying presents for our loved ones, but don’t we, the makers, deserve a little something?
Whether you need a small, yet powerful maker computer, a new soldering iron, electronics kit or a low-cost tiny microcontroller, I’ve got you covered with some great deals on the tech that I have personally used. These are products that I have tested, used and paid my own money for!
Becoming a maker doesn’t have to be expensive. Shop smartly and you can save some money and get the tools that you need. If you need a low power desktop for the makerspace then the Raspberry Pi 5 can handle all of your maker projects with plenty of power in a form factor which can be integrated into a project. Soldering irons are no longer big, clunky stations on your desk (I’ve got a soldering station in my workshop). We can use a smart soldering iron which gives us full temperature control in a much more wallet friendly and space saving way. I reach for my smart soldering iron (a Miniware TS101) on a daily basis.
I’ve collected a few essential maker based products which should feature on your shopping list this Black Friday season.
Key Maker Products
- Single Board Computer: You don’t want your fancy gaming rig getting dirty in the makerspace / workshop so an SBC is a good standby. The added bonus is that it can also be embedded into a project.
- Learning Kits: Learning electronics and coding can be tough, but using a kit makes it much easier. Whether you are a new user, or helping someone take their first steps, a kit will make a world of difference.
- Soldering Irons: There is no piece of technology that has not felt the heat of a soldering iron. Soldering is the most basic maker skill and thanks to a plethora of soldering iron choices there are many to choose from.
- Microcontrollers: Sometimes you don’t need the full power of a Linux based SBC in your project and this is where a low power and low cost microcontroller comes in. They can communicate over Wi-Fi, use remote APIs and read sensor data just as well as an SBC, but with much lower power consumption.
- Raspberry Pi HATs: HATs fit on top of the Raspberry Pi GPIO and provide extra features such as motor control, sensor data and even RGB LED matrices. No soldering required, we just place them on the GPIO, run some code and we are done.
- 3D Printer: Even a decade ago, a decent 3D printer would set you back thousands of dollars, but now we get great quality for under $200. 3D printers come in many configurations, but the typical “bed slinger”, a term used to identify printer which move the print bed, is where nearly all of us start, and for good reason. They are cheap and easy to use.
The Maker’s Standard: Raspberry Pi 5

In the past 11 years, I’ve tested and professionally used many different single board computers (SBC) and microcontrollers. Even after all this time, the Raspberry Pi wins. In the past there were many more powerful SBCs than the Raspberry Pi, but with the release of the Raspberry Pi 5 we have the fastest Raspberry Pi ever. The longevity and interest around the Raspberry Pi also means there is a rich library of support on offer.
The Raspberry Pi 5 retails from $60 for the 4GB model or you can double the RAM and pay only $80. I’d go for the 8GB model if this were my first Raspberry Pi, if not then the 4GB model has more than enough power for most maker projects.
No matter the RAM, your Raspberry Pi 5 is powered by a Broadcom BCM2712 SoC which has an Arm Cortex-A76 64-bit CPU running at 2.4 GHz and an 800 MHz VideoCore VII GPU. There are two micro HDMI ports for dual 4K output, USB 3, dual camera / screen connections and the all important GPIO.
The Raspberry Pi 5 has the power to be your desktop computer and maker toolkit. Add to this the upcoming addition of M.2 SSDs via a HAT and we have a powerful, yet tiny platform for many maker projects.
I love the Raspberry Pi 5, it is a solid base for projects and the price is only a little more than the Raspberry Pi 4 that it replaces. Pick up a board for yourself and take a look at our guides to overclock the Raspberry Pi 5 , use the GPIO and how to emulate the Sony Playstation 2 with the Raspberry Pi 5.
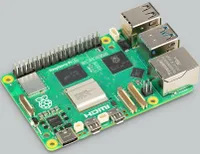
Raspberry Pi 5: 4GB for $60, 8GB for $80 at Adafruit
The new Raspberry Pi flagship is a powerful platform for learning and making. Performing 4-5 times better than the Raspberry Pi 4, yet keeping the same form factor is a remarkable achievement and makes this THE board for your next project.
The Best Kit for Learning: Seeed Grove Shield for Raspberry Pi Pico
Electronics is a fun hobby, heck I made a career out of it. But starting out can be tough. Don’t know your I2C from SPI? DS18B20 from your DHT22? And where does this wire go? What you need is an easy to use connection, no soldering, just plug and play. This is where the $10 Seeed Grove Shield comes in.
Drop your Raspberry Pi Pico or Pico W into the center of the board and you will see a series of white connectors flanking the Pico. These are Grove connectors, designed to work with Grove components. The connections can only be inserted one way, ideal for those starting out in electronics, or experts looking to rapidly prototype a project.
Grove components can be purchased for just a little more than standard components, you’re paying for the convenience of the connector.
I bought into the Grove and the Stemma QT connection systems big time. They are both so easy to use, but this little board was the one that got me started and it holds a special place in my heart, and bits box.
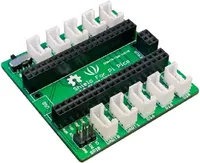
Seeed Grove Shield for Raspberry Pi Pico: $9 at Amazon
This easy to use add-on brings a world of sensors to the Raspberry Pi Pico, without the need to pick up a soldering iron. Low-cost and easy to use components can now be incorporated into your next build.
The Best Soldering Iron: Miniware TS101
I’ve tested a slew of soldering irons for our best soldering iron and soldering stations page. The current trend is for “smart” soldering irons with an OS that controls every aspect of the iron. Leading this trend are Miniware and its TS101, the best soldering iron for your money.
The TS101 can be powered via USB C or a DC 9-24V supply and it heats up in 15 seconds. By heats up I mean it gets to a working temperature of 350 degrees Celsius in 15 seconds. It cools down relatively quickly, in just a few minutes it should be safe to touch the soldering iron tip. The included TS-B2 conical tip is a good all-rounder but a quick shopping trip on Aliexpress will reveal all the tips that you need. My preference is a conical chisel tip, precision and a large thermal mass in one package. The TS101 uses tips for the TS100 and Pinecil range of soldering irons so there are plenty to choose from.
Being a smart soldering iron means I can tweak the configuration of the iron to meet my needs. Plug in the TS101 to a computer and it appears as a USB flash drive. Open the config Tweaking a config file using any text editor
The elephant in the room is cost. The TS101 is much more expensive than the Pinceil. But I would gladly pay the extra to enjoy the level of comfort that the TS101 affords. Long soldering sessions will feel much better with a comfortable soldering iron.
Pinecil is a viable alternative, if you can find them in stock, but the smart money for the smart soldering iron goes to the TS101.
Grab an iron using this link , this pack contains a DC power supply.
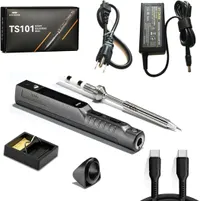
Miniware TS101: $79 at Amazon
Comfortable grip, smart temperature control and easily configurable, there is a lot to like with this soldering iron. It can be powered from USB C or DC power which makes it ideal for the workshop and your maker EDC.
The Best Microcontroller: Raspberry Pi Pico W
$8 doesn’t buy you much in the world of tech. But for that $8 you can pick up a Raspberry Pi Pico W , a simple to use microcontroller with Bluetooth and Wi-Fi connectivity. As you have already guessed, this is from the same team that brought us the Raspberry Pi.
The Raspberry Pi Pico W is a wondrous little board. I’ve worked with Arduino , ESP32 ATTiny85 etc but the Raspberry Pi Pico’s RP2040 is a powerful little chip. Based around a dual core Arm Cortex M0+ running at 133 MHz (it can be overclocked) and with 264KB of SRAM and 2MB of flash storage, this little board can power your robots, machine learning or data collection projects with ease.
Within five lines of MicroPython I can connect the Raspberry Pi Pico W to the Internet, and with a few more I can get data from remote APIs or send data to remote locations using protocols such as MQTT. If MicroPython isn’t your thing then we can use Lua, JavaScript, C/C++, even BASIC!
You’ll get a lot from this board, and all for just $8. Spend a little more, $14 in total, and you can get a Raspberry Pi Pico WH with pre-soldered GPIO pins. Or you can learn to solder them yourself as an excuse to buy the TS101 soldering iron.
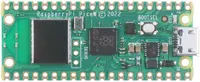
Raspberry Pi Pico WH: $11 at Amazon
The Raspberry Pi Pico W is a low-cost, powerful microcontroller that is dominating the projects of makers across the world. The inclusion of Wi-Fi and Bluetooth along with great documentation, makes this a great board for your builds, and as a gift to those who are starting out.
The Best Raspberry Pi HAT: Raspberry Pi Build HAT
Makers of any age and ability love Lego, but what if our Lego collection could be controlled using a Raspberry Pi? This is where Build HAT comes in. Created as a collaboration between the Raspberry Pi and Lego teams, this HAT is all about using Lego Technic, Spike and Mindstorms components in your build.
Build HAT has bespoke connectors for the many Lego components, enabling a direct connection. A Python library abstracts the complexities, providing an easy to use interface to control components, and to read the values of components such as color and force sensors.
I had a great time building a color-sensing contraption which scanned an item and used the reflective color data to turn on a string of NeoPixels to match the color. Build HAT is a great product and a worthy addition to a maker's bits box. It is also ideal for new, perhaps younger makers, who are looking to move into the world of electronics and Raspberry Pi.
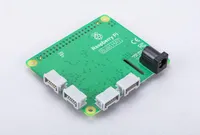
Raspberry Pi Build HAT: $29 at Amazon
Easy to work with and you get to play with Lego and call it “work”. In all seriousness the Build HAT is a great board to help younger makers transition from Lego to typical electronics components.
The Best 3D Printer: Elegoo Neptune 3 Pro
Sure there are now Elegoo Neptune 4’s in the wild, but the Neptune 3 range is now super-cheap and produces excellent print quality. How do I know this? There is one working away to my left as I write.
I came into 3D printing via the Anet A8 and was underwhelmed. It took some time, but then I moved onto the Creality Ender 2 Pro. Why? It is dirt cheap and produces great prints. The downside of that printer is manual bed leveling.
The Elegoo Neptune 3 Pro is a direct drive printer, filament goes directly into the print head assembly. A gear pulls the filament to the hotend and out comes hot plastic. Assembly is a breeze, it is half a dozen screws and a few cables to clip into place. Bed leveling is automatic, all I needed to do was tweak the Z-offset and I was off printing.
The Neptune 3 Pro uses a Marlin firmware, it is old but dependable. The newer Neptune 4 series use Klipper which produces a faster print experience. You’ll pay extra, but if speed is what you crave, go for the 4. This does mean that the older Neptune 3 Pro can now be found for a much cheaper price and in my opinion it is worth your money.
My Elegoo Neptune 3 Pro is a daily driver, churning out high quality prints with ease, my older Creality Ender 2 Pro is now sporting a .8 nozzle and is used to mass produce functional parts for my workshop.
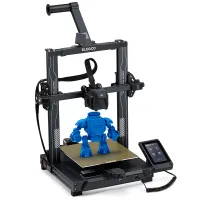
Elegoo Neptune 3 Pro: Now $199 at Amazon (was $299)
If you want great prints but without all the manual leveling, then the Neptune 3 Pro is for you. Simple to use and it produces fantastic results with very little tweaking. This is a work horse of a 3D printer that will keep churning out the prints while you work on the next.