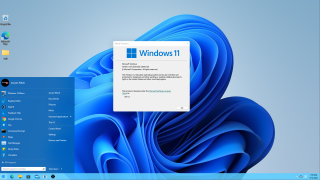
Windows 11 has some interesting new features, but its UI is polarizing. If you're like me, you want to play around with the new operating system, but don't like its version of the Start menu because it takes much more screen real estate. In the first preview build of Windows 11 , you were able to tweak a registry setting and get back Windows 10's Start menu, but Microsoft killed that option with the first major update.
Fortunately, with a third-party app and possibly a registry tweak, you can get a different style of Start menu that's closer to the look and feel of Windows 7 than Windows 10 and gives you lots of options. There are a few different utilities out there but I tested with the two most popular: Open-Shell (formerly Classic Shell), a free open-source app, and Stardock's Start10 , which costs $5 and has a more polished and Windows 10-like look. Both worked, though Start10 had a bug where its Start button wouldn't appear unless I made a change in the registry that would brand back a classic taskbar look (more on that later).
Below, I'll show you how to replace the Windows 11 Start menu with either of these third-party utilities and make sure they appear in the right place.
Left Aligning the Taskbar Icons
To use any of the current Start menu utilities, you need to align your taskbar icons to the left. Both programs' buttons try to appear in the lower-left corner of the screen, so by shifting Windows 11's native button to that location the third-party one appears on top of it.
Also, if you don't install any third-party utilities, you may still want to put your icons on the left, because that gives Windows 11 a much more traditional feel than it has by default.
To shift your taskbar icons to the left:
1. Right click on the taskbar and select Taskbar settings .

2. Open the Taskbar behaviors menu .

3. Select "Left" from the Taskbar alignment menu.

Using Open Shell
Open Shell is a free, open-source utility that gives you a Windows 7-style Start menu and a ton of options for customization. The picture below shows what Open Shell looks like. It also has its own built-in search box.

Getting started with Open-Shell is as easy as downloading the latest version from Github and installing it. Just make sure you choose the right Start button icon. Open-Shell gives you a choice of a couple of Start buttons or the option to upload your own image. However, I found that the custom button images I uploaded were often invisible or parts of them were invisible until I clicked on them.

Your Start button icon appears on top of the Windows 11 Start button, but if the one you choose doesn't completely cover it and you click an uncovered part, it will launch the Windows 11 Start menu.

The most reliable Start button icon is the default "Aero" button which is a circular shell icon. On our PC, it covered the complete Windows 11 Start button, but if I clicked in the blank space to the left of it rather than directly on the button, I still get the Windows 11 Start menu. The larger, rectangular Start button can solve that problem, but it may cover over parts of your other icons.

Using Start10
Stardock's Start10 is a bit more polished-looking than Open Shell, though it costs $4.99 after a 30-day trial and, as of this publication time, it only works if you enable the classic taskbar (see below). Start10 also has a "Windows 10 style" Start menu that promises the Windows 10 look and feel, complete with tiles. However, as of this writing, only the "Windows 7 style" and "Modern style" modes work. Presumably, Stardock will fix this at some point. The good news is that, with Start10, you can use the actual Windows 10 Start button icon if you want.
Below is a screenshot of how Start10 looks in Modern style. There's also a built-in search menu that works really well for finding your apps.

After you download and install Start10 . you can set the style and control lots of fine details like the size of the icons and how many columns you have. On the Style tab, you can set the Start button icon and we strongly recommend going with the Windows 10 icon.

Enabling Classic Taskbar
In order to get Start10's button to appear and be clickable at this point (perhaps in the future this will change), you need to enable the classic taskbar in the Registry. This taskbar looks and feels a little bit more like the Windows 10 taskbar and has a Search box and a Task View button.
However, neither of these works. The Search box does absolutely nothing when you click on it and the Taskview, in my experience, almost always crashes, causing icons even of open apps to disappear temporarily, so in other words, don't click it , or better yet, hide it , which we'll show you how to do.
1. Open Regedit . You can launch it by hitting Windows + R and typing "regedit." Click Yes if prompted.

2. Navigate to HKEY_LOCAL_MACHINE\SOFTWARE\Microsoft\Windows\CurrentVersion\Shell\Update\Packages .

3. Create a new DWORD (32-bit) value by right clicking in the right window pane and selecting New->DWORD (32-bit) Value.

4. Rename the value to UndockingDisabled .

5. Set UndockingDisabled to 1 .

6. Close regedit and restart Windows 11 . The classic taskbar will be there, but you'll notice on the left side that the clock, audio and networking icons are missing.
7. Launch the notification icons control panel by hitting Windows key + R and entering shell:::{05d7b0f4-2121-4eff-bf6b-ed3f69b894d9} then hitting Ok.

8. Click "Turn system icons on or off."

9. Toggle Clock, Volume and Network to On . The icons will now appear on the left side of the screen.

10. Hide the "Task view" icon (optional). Since this function tends to crash, I recommend hiding the button by right clicking on the taskbar, selecting Taskbar settings and toggling Task view to off.

11. Hide the search box (optional). Since the search box doesn't actually work, your best bet is to hide it by using Regedit to navigate to HKEY_CURRENT_USER\Software\Microsoft\Windows\CurrentVersion\Search and setting SearchTaskbarMode to 0 and then restarting Windows. The good news is that the Start menu replacements have their own search boxes built in.

In the end, you will have a taskbar that works with Start10 and looks a bit more Windows 10-like. You'll also have right-click, jumplist menus that look like Windows 10 and have all the options on them, as opposed to the Windows 11 menus that only a show a maximum of 7 options. That may be reason enough to make this tweak, even if you don't plan to use Start10.